Donnerstag, 13. Juli 2017

TFS 2015 - setting the test run working directory of a Visual Studio Test task

We're moving from ccnet to TFS 2015. So it's the TFS 2015 build system, doing integration and nightly full builds.
Of course there's also tests, which are run by vstest.console.exe via a Visual Studio Test Task.
Unfortunately, many of our tests use resources which are parked outside of the test lib, in some "TestDataFolder". This works all great as long as your current working directory is what you think it is. (side note: I strongly disagree with this. Imho, all test resources should be included in the test lib. If you need too many resources, you're likely doing something wrong.).

Note: It looks like I experienced this only for test assemblies that had used [DeploymentItem(..)] attribute. Without such an attribute, the test dir seems to be the directory where the library is build to.

Anyhow. These builds are run by TFS agents. And those have a working directory, like:
E:\agentX\_work\13\
13 being .. the 13th checked out source branch? Don't know yet.

The sources are in
E:\agentX\_work\13\s\

And the test lib in e.g. E:\agentX\_work\13\s\MySolution\MegaLib.Tests\bin\MegaLib.Tests.dll is executed with vstest.console.exe from the path:
E:\agentX\_work\13\TestResults\<deploy_id_date>\out

That sucks, cause being outside of the source tree, the logic for finding the "TestDataFolder" doesn't work anymore.
It took a while to find out how to set the base directory of each test run.

Solution: use a myTestSettings.runsettings file, and set the ResultsDirectory for the TestResults, which also manipulates the current working directory when the tests are run.
<RunSettings>  
 <RunConfiguration>
  <!-- Path relative to solution directory.
                        It also makes the directory traversal
                        for finding the unittestdata folder work -->  
  <ResultsDirectory>.\TestResults</ResultsDirectory>
 </RunConfiguration>  
</RunSettings>  
The path for myTestSettings.runsettings is relative to the source root directory (for which even a variable exists: $(Build.SourcesDirectory))
Well, there's probably also a way to set the Common.TestResultsDirectory, but I haven't found out yet how to do that via such a VSTest task (from TFS build - predefined variables).

Freitag, 9. Juni 2017

Using shareProcess instead of ownProcess for windows services can yield a very confusing message

When registering a windows service with an msi, using wix, one is usually doing this:
<wix:ServiceInstall Id="MyServiceInstall"
     Name="MyService (Hostfunc1)"
     DisplayName="My Super Service"
     Description="Some Description"
     ErrorControl="ignore" 
     Start="auto"
     Type="ownProcess" 
     Vital="yes" 
     Interactive="no" 
     Account="[SERVICEUSER]"
     Password="[SERVICEPWD]" />

I did the mistake of using
Type="shareProcess"
which gave me the perfectly correct error message that didn't help me at all:
"Error 1083: The executable program that this service is configured to run in does not implement the service."

Setting the Type to "ownProcess" again solved the problem.

Dienstag, 13. September 2016

Hyper-V Host does not set ICACLS permissions for new virtual machines

We have a Windows 2012R2 Hyper-V Host, and as things go, someone apparently did something and suddenly we had to resort to hacks to make new VMs run.

So, how did the problem manifest? Whenever someone added a new VM, either using a new virtual disk or a template, this exception would pop up:
'TestVm' could not initialize.
An attempt to initialize VM saved state failed.
'TestVm' could not initialize. (Virtual machine ID ....)
'TestVm' could not create or access saved state file 80F7C822-455B-4D70-9D73-B250196B36A9.vsv.

We had a fix/hack for solving this.
Run the following command in a cmd-prompt (not PowerShell!):

D:\Hyper-V\02250683-9FD8-4286-95CC-5C131F6A09DE>
icacls 02250683-9FD8-4286-95CC-5C131F6A09DE.vsv /grant "NT VIRTUAL MACHINE\02250683-9FD8-4286-95CC-5C131F6A09DE":(F)

However, remembering that for every new VM is not much fun.

The problem was, that the folder permissions on the folder with the Hyper-V VM disks and configurations lacked a permission for the "Hyper-V Administrators".

I changed the permission on the base folder holding the disks and the configs by adding the Hyper-V Administrators group of the local machine, and the problem was gone:

Dienstag, 1. Dezember 2015

Installing .NET versions with wix bundles (and determine which one is already installed)

There's a nice help page from MS:
Which .NET does come with which OS and how do I determine what is installed: https://msdn.microsoft.com/en-us/library/bb822049(v=vs.110).aspx

For msi packages, there's an extension which does this work for you and determines whether e.g. .net 4.5 is installed: WixNetfxExtension, but the suggested PropertyRef (<PropertyRef Id="NETFRAMEWORK45"/>) doesn't work with burn.

So, for the bundle, the game is slightly different. Just do a:
<util:RegistrySearchRef Id="NETFRAMEWORK45"/>
this needs the utils extension.

And it'll only give you a version number, so you'll have to check against that. Which .net has which version number can be gleaned from the first link to MS, or from here.

Of course, there's already a stackoverflow answer for that :)

And finally, to install e.g. .NET 4.5 with your bundle, you can use this magic package group id in the chain if you use the NetFxExtension:

<Chain> <PackageGroupRef Id="NetFx45Web"/> </Chain>

That should make the bundle download the appropriate .NET framework. See also here: http://wixtoolset.org/documentation/manual/v3/howtos/redistributables_and_install_checks/install_dotnet.html

Donnerstag, 2. Juli 2015

Wix and msi installers: downgrade a library during a msi upgrade

Here's a tricky one I came across at work:

If you look closely, with an upgrade of OurProduct, we downgrade a library. So what? you say. (Hint: try not to ever do a library version downgrade! It's painful.)

Well, it turns out, that with xcopy, this problem would easily be solved. Your forfeit all the other kinda cool things that msi can do, though. Not the path we'd like to go.

So, what to do?

Just to show the baseline: this is the component of the initial OurProduct:
    <Component Id="Newtonsoft.Json" Guid="SOMEGUID-42FD-44B5-8C93-C245F85DF84E">
      <File Source="Newtonsoft.Json.dll" KeyPath="yes" /> <!-- version 5.0 -->
    </Component>

How do we downgrade that?
Ok, easy, just pack in the new lib, take the old component guid, and do configure major upgrades just like this:
<MajorUpgrade
     DowngradeErrorMessage="A newer version of [ProductName] is already installed." 
     Schedule="afterInstallValidate" />
this is the default scheduling used by Wix now, it will remove the old product first (that's the 'RemoveExistingProducts' Action), and then install the new product. That means, it removes this Newtonsoft.Json lib before it puts in the version of the upgrade.

Try #1 - fail

We also pack in the new version
<!-- Try #1 -->
    <Component Id="Newtonsoft.Json" Guid="SOMEGUID-42FD-44B5-8C93-C245F85DF84E">
      <File Source="Newtonsoft.Json.dll" KeyPath="yes" /> <!-- version 4.5 -->
    </Component>
same guid, same thing, lower version.
And it doesn't work:
Action start 17:32:45: CostFinalize.
.....
MSI (c) (38:C0) [17:32:45:977]: Disallowing installation of component: {SOMEGUID-42FD-44B5-8C93-C245F85DF84E} since the same component with higher versioned keyfile exists
Action ended 17:32:45: CostFinalize. Return value 1.

What please? Why does it exist?

As you can see, the msi plans the installation of components in the CostFinalize Action, which is pretty early in the whole InstallExecute sequence. And it's even before the first possible scheduling location of the removal of the old product. CostFinalize runs before InstallValidate. Damn.

What did I have on the system, after this upgrade above finished? The file was gone: the upgrade says it won't install it, the previous version removes it, the upgrade will not install it again => the file is gone. Solution? Repair the new product. But then it'd be easier to uninstall the previous product, and then install the new version. I looked on StackOverflow for help: http://stackoverflow.com/questions/15138731/wix-major-upgrade-not-installing-all-files, but the first answer didn't work for me. The file was even left in the higher version (5.0).

Try #2 - fail again

Ok, let's give it a new guid, then the old component is removed
<!-- Try #2, new guid!! -->
    <Component Id="Newtonsoft.Json" Guid="SOMEGUID-DE0F-4CC9-BC16-2FF543B2FA90">
      <File Source="Newtonsoft.Json.dll" KeyPath="yes" /> <!-- Version 4.5 -->
    </Component>
Well, we will still get
Disallowing installation of component: {SOMEGUID-DE0F-4CC9-BC16-2FF543B2FA90} since the same component with higher versioned keyfile exists
What please? This component is supposed to be new!?!
What the windows installer does here is compare keyfile paths (which probably means it compares the path of the key resource). So it sees the resource already lying there, in a higher version, and doesn't want to overwrite it.

Try #3 - finally succeed

In the end, I found out that there's still a chance how you can do it, but it's not nice:
<!-- Try #3, with still another guid -->
    <Component Id="Newtonsoft.Json.Fix" Guid="SOMEGUID-A46A-4C3E-801A-6F79B16CD0B4">
      <File Source="CarryOn.dll" KeyPath="yes" />
      <File Source="Newtonsoft.Json.dll" />
    </Component>
This works. It's not my idea, I found it somewhere, kudos to whoever wrote it.
This will make the installer look for the CarryOn dll, which can be any other dll where you go for higher versions with upgrades. The old installer will remove the old, higher versioned, Newtonsoft.Json, and the new installer will place the new, lower versioned, library.

There seem to be other answers to this problem out there. I didn't try them. They seem to require InstallShield, some other wix control elements like RemoveFile, scheduling of the RemoveExistingPRoducts to before CostFinalize or they even manipulate the msi directly by convincing it that the lib it has actually has a higher version. The latter will probably just create problems later:
http://stackoverflow.com/questions/30377613/downgrade-file-in-majorupgrade (schedule after CostFinalize)
http://stackoverflow.com/questions/4227456/windows-installer-deletes-versioned-file-during-product-upgrade-instead-of-down (schedule after CostFinalize)
http://stackoverflow.com/questions/14122136/how-can-i-make-sure-a-downgraded-library-is-installed-by-my-msi (hack the msi database)
http://stackoverflow.com/questions/25311969/how-to-downgrade-a-third-party-file-in-a-wix-msi (spoiler: the answer does not work)

It seems, that this is a seldom occurring problem, which doesn't really concern those who are in charge of the msi installer itself. So, rather try to not run into this problem. If you do custom compiles of open source stuff, maybe even chose to take a lower version than the current release which you probably end up using some time later.

Freitag, 22. Mai 2015

Downloading the Microsoft Azure SDK 2.3 (aka: why doesn't MS provide direct download links???)

I need this every now and then, and I'll always run into the Microsoft website's bad installation experience, which doesn't seem to work with chrome or Firefox - no, you need IE.
There is a web platform installer making this easier, but that unfortunately doesn't install the v2.3 Azure SDK.

I took those links from this MS site.

So here they are, and a little hint for me what I need for VS2013 and compiling Apps into Azure Roles:

WebToolsExtensionsVS.msi
WebToolsExtensionsVS2013.msi
WebToolsExtensionsVWD.msi
WebToolsExtensionsVWD2013.msi
WindowsAzureTools.vs110.exe
WindowsAzureTools.vs120.exe - my pick
WebToolsExtensionsVWD2013.msi
WindowsAzureStorageEmulator.msi - my pick
WindowsAzureLibsForNet-x64.msi - my pick
WindowsAzureLibsForNet-x86.msi
WindowsAzureEmulator-x64.exe - my pick
WindowsAzureEmulator-x86.exe
WindowsAzureAuthoringTools-x64.msi - my pick
WindowsAzureAuthoringTools-x86.msi

Mittwoch, 25. Februar 2015

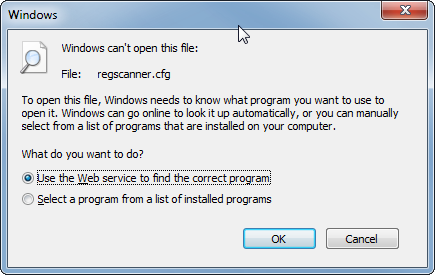
File associations with windows - especially: I can't set the default program for an extension anymore

This might expand in the future.. windows registry is deep ;)

My problem was, that using either of those 2 dialogs didn't help to set the default program. I chose a file, but no association was made. Why???
Neither here: Control Panel\All Control Panel Items\Default Programs\Set Associations
Nor here: Open with dialog
In the end, this link gave me the tip:
fire up regedit, go to
HKEY_CURRENT_USER\Software\Microsoft\Windows\CurrentVersion\Explorer\FileExts
and then delete the "OpenWithProgids" subkey from your extension:
The id is probably broken, who knows?
In any case, seems like the id prevented me from assigning a different default program. Once that's gone, you can re-assign any program with the extension that you want.

Freitag, 5. Dezember 2014

Debugging your deployed native release build on a remote machine with visual studio

Another cpp nightmare.
Debugging managed libraries remotely was rather easy. Have the remote debugging tools installed, run the code on the remote machine, attach to it via your local VS, have the right pdbs ready, done. You're debugging.

Of course, you should be sure that the pdbs actually match the dlls. That can be checked with an appropriate tool.

For native code, apparently, the debug symbols need to be placed into the same directory as on the remote machine. Like, if it's remotely in "C:\some\where\strange\myProg.exe", then you need to create this strange directory on your local machine as well.

I didn't find anything on the web which explicitly stated that.

Here are some other links, which might be of help:
http://www.codeproject.com/Articles/146838/Remote-debugging-with-Visual-Studio
Remote Debugging and Diagnostics (vs 2013)
and, of course, a most cited resource about pdb files in general (native and managed):
http://www.wintellect.com/blogs/jrobbins/pdb-files-what-every-developer-must-know

But they seem to deploy directly what you build to a remote machine, instead of having corporate release builds installed on them and then debugging them with the pdb files which the build machine thankfully published as well.

cpp c++ linker warnings which look like name mangling problems but are cause by classes not being exposed in the dll

Today, I wanted to write some tests for a cpp dynamic library under windows.
Such a build still generates the .lib file, like for static libs, but this .lib file only contains some header information or somesuch.
In the end, the .dll will be used.

Then, when I tried to compile the tests, I got this:
1>SwarmTests.obj : error LNK2001: unresolved external symbol "public: __thiscall Swarm::SpecificChainer::SpecificChainer(long,class std::basic_string<wchar_t,struct std::char_traits<wchar_t>,class std::allocator<wchar_t> > const &,class std::basic_string<wchar_t,struct std::char_traits<wchar_t>,class std::allocator<wchar_t> > const &,class Swarm::ZergLink *)" (??0SpecificChainer@Swarm@@QAE@JABV?$basic_string@_WU?$char_traits@_W@std@@V?$allocator@_W@2@@std@@0PAVZergLink@1@@Z) 1>C:\dev\mycode\SwarmTests\Debug\SwarmTests.exe : fatal error LNK1120: 1 unresolved externals

After several hours of despair, I found out that the class:
Swarm::SpecificChainer
was declared like this:
class SpecificChainer {
 ctor...
  ...
}


But should have been declared like this:
class DLL_PUBLIC SpecificChainer {
 ctor...
  ...
}


The keyword is DLL_PUBLIC which will expose this class to the users of the dynamic library. See here on gnu.gcc.org for further information. All non-exposed classes are only visible internally.

I still don't know, why it's done like this, whether this is only on windows (can't remember that on linux) and if it's common for all dynamic cpp libs, why they didn't invent some smart keyword for that, like in c#: internal.

Dienstag, 14. Oktober 2014

Modular build scripts with NAnt

We are using NAnt for our build process. Since the product is large, this amounts to things like this:
  1. clean up the source tree => clean slate
  2. build all projects (~50 mins) => compiled libraries and executables
  3. run all tests (~2 hours)
  4. run benchmarks
  5. create installer (msi/bootstrapper)
  6. publish to a file share
This all amounts to several thousand lines of nant code. And because we know naught about modularizing things and decoupling things, this all becomes basically one big nant file. That is not maintainable.

We tried to modularize things a bit by putting common code into nant files, like this:
<include buildfile=".\installer.prop" />
which are just included by other nant files. So, we kind of reduced code duplication a bit.

Problems remain:
  • you don't know where your property has been set for the first time
  • if it has been reset to something else
Additionally, we have to deal with the problem that by using nant we have to use a declarative language to do loops, maintain file lists, have few insight in how properties are kept in memory.
It's even difficult to see the workflow of this whole monster.

I currently think, that for such large projects nant is the wrong tool. I'd like to try rake.
However, maybe we're just using nant the wrong way.

There is a way we should use more to modularize all those build scripts and make them independent:
  • separate nant files, each of which does one thing, and one thing well. Kinda like the Single Responsibility Principle. It's code, after all.
  • have integrating nant files which call other nant files. Those integrating nant files should not have logic.
  • when calling other nant files, do not inherit the properties of your current state (to inherit is actually the default).
In practice, this would look like this:
<project name="integrator" basedir=".">
    <property name="baseDir" value="${project::get-base-directory()}" />
    <target name="build">
        <!-- we integrate stupid targets here.
                they do not contain logic, they just call someone else -->
        <call target="cleanBuildfiles" />
        <call target="buildSoftware" />
        <call target="buildInstaller" />
        <call target="publishSoftware" />
    </target>
    <target name="buildSoftware">
        <!-- inheritall="false" prevents the called nant scripts from
                inheriting all what we already might have screwed up.
                It's a fresh start. An error in this script doesn't
                affect those other scripts. Modular :) -->
        <nant 
            buildfile="${baseDir}\myFramework\default.build" 
            target="buildAll"
            inheritall="false">
            <properties>
                <!-- if that nant script depends on a certain global
                        variable, inject it -->
                <property name="CCNetLabel" value="${CCNetLabel}" />
            </properties>
            </nant>
    </target>
    <target name="buildInstaller">
        <nant 
            buildfile="${baseDir}\installer\default.build"
            target="buildInstaller"
            inheritall="false" >
            <properties>
                <!-- or directly give an apt name 
                        to such input variables -->
                <property name="BuildNumber" value="${CCNetLabel}" />
            </properties>
            </nant>
    </target>
</project>
I can't yet say that this will make nant easier to use, but I already feel that I have a better overview of what is done where. Maybe it will help me keep order and find errors in the future.

Mittwoch, 19. Juni 2013

Authoring a patch bundle

After the main program is deployed the maintenance will have to deploy fixpacks and service packs. I wondered how I should handle this with burn and decided to use a separate patch bundle.

Versioning used in this sample is MajorNumber.ServicePack.FixPack. Each patch bundle also has a separate UpgradeCode, because when removing bundle v1.0.0.1 while bundle v1.0.0.2 was installed  might leave the system with the v1.0.0.1 patch (issues about superseded patches.. see here).

Now I had several bundles, which all were authored to be a patch for the main bundle. That looks like this:
<Bundle Name="PatchingBundle 1.0.0.1" Version="1.0.0.1"
    Manufacturer="Jakob Devs Inc." UpgradeCode="[patch_bundle_code_v1.0.0.1]"
    ParentName="BaselineBootstrapper">
    <RelatedBundle Id="[parent_bundle_code]" Action="Patch" />
</Bundle>

There are several things of note here:
  • The UpgradeCode of this patch bundle is new, this leads to a separate entry in ARP's updates
  • ParentName: this puts the bundle in ARP's update section under the name BaselineBootstrapper. This should be the same for all patches.
  • RelatedBundle element: here I specify that this bundle patches the <parent_bundle>. This leads to this bundle being uninstalled when the <parent_bundle> is uninstalled. Cool :)
    To remove a Sp1Fp1 patch when the service pack is uninstalled, the parent_bundle_code will be the UpgradeCode of the ServicePack patch bundle.
Once a service pack is deployed, there'll be patches which target the service pack. These msp patches won't install on systems which don't have the service pack installed. I talked about that topic here.
To get  a state on the system where the user can remove installed patches, the burn engine offered me basically one solution:
Install every patch under a different UpgradeCode, so that all patch bundles show up in ARP.

The patch itself could theoretically be installed as superseding or not, I didn't find any difference so far. However, burn does not remove superseded patches, that's why I opted for non-superseding patches. They still all contain the diff to the baseline, though. Baselines will be the RTM or SP releases.
[Edit]: Apparently, an upgrade of version 1.0.0.x to 1.0.1 (yep, a service pack) always makes the patch superseding. That also means, when I'd uninstall bundle 1.0.0.1 while 1.0.1 is installed, the superseded patch stays on the system.

Just for the sake of completeness: what would the complete sequence of main installer, service pack, fix pack for SP look like?
<Bundle Name="Main RTM Bundle 1.0.0.0" Version="1.0.0.0"
    Manufacturer="Jakob Devs Inc." UpgradeCode="[main_bundle_code]" >
    <!-- no related bundle here ... -->
</Bundle>

The service pack is basically again a patch, so we'll relate it to the main RTM bundle above.
<Bundle Name="PatchingBundle 1.0.1.0 - SP1" Version="1.1.0"
    Manufacturer="Jakob Devs Inc." UpgradeCode="[patch_bundle_code_v1.0.1.0]"
    ParentName="BaselineBootstrapper">
    <RelatedBundle Id="[main_bundle_code]" Action="Patch" />
</Bundle>

Then I would author the fix pack for this service pack as this, but I relate it to the service pack patch. Of course this fix pack should have the diff from the SP1 baseline to the patch. It doesn't have to use the RTM as the baseline anymore. It'll get uninstalled when the SP is uninstalled:
<project name="integrator" basedir=".">
 <property name="baseDir" value="${project::get-base-directory()}" />
 <target name="build">
  <call target="cleanBuildfiles" />
  <call target="buildSoftware" />
  <call target="buildInstaller" />
  <call target="publishSoftware" />
 </target>
 <target name="buildSoftware">
  <nant 
   buildfile="${baseDir}\myFramework\default.build" 
   target="buildAll"
   inheritall="false"/>
 </target>
 <target name="buildInstaller">
  <nant 
   buildfile="${baseDir}\installer\default.build"
   target="buildInstaller"
   inheritall="false" />
 </target>
</project>
Here it also makes sense to use the <bal:Condition> element so that the Sp1Fp1 only installs if the service pack for the main RTM bundle is installed.

Dienstag, 18. Juni 2013

Conditioning a wix bundle when it should or should not run

I started to have this question when I prepared a patch bundle which should only install when the main product is already installed. Additional complexity is given when a service pack was applied and patches require the service pack to be installed. In an additional post I explain how to author patch bundles and how to remove fix pack bundles on top of SPs along with the service pack bundle.

Wix bundles have two points where you can configure whether they should execute or not.

The first which you'll find is the bundle/@Condition attribute:
<Bundle
    Name="TestBundle" Version="1.0.0.0"
    Manufacturer="TestDeploy Inc." UpgradeCode=""
    Condition="((VersionNT = v6.0) AND (ServicePackLevel &gt;= 2)) OR (VersionNT &gt;= v6.1)"
>
<!-- bundle stuff -->
</Bundle>
Here the condition checks that at least NT in version 6.0 (Windows Server 2008) is installed with at least ServicePack 2, or that the windows versions bigger than 6.1 (Windows 7). Microsoft provides a list of the windows versions.

This can only be used with prebuilt wix burn variables. A list of those can be found herehttp://wix.sourceforge.net/manual-wix3/bundle_built_in_variables.htm.

The second method requires the WixBalExtension's Condition element:
<bal:Condition
   Message="The Bootstrapper has to be installed in version $(var.BaselineVersion)">  
      WixBundleInstalled OR      
      ((SampleMsiInstalledState = 5) AND (SampleMsiInstalledVersion &gt;= v$(var.BaselineVersion)))
</bal:Condition>
<util:ProductSearch Guid="[msi_prerequisite_package_product_code]"
    Result="version" Variable="SampleMsiInstalledVersion" />
<util:ProductSearch Guid="[msi_prerequisite_package_product_code]"
    Result="state" Variable="SampleMsiInstalledState" />
Here we use a ProductSearch from the WixUtilExtension to find the state and versions of related msi packages. The version is then compared to the minimum version of a bundle that's required for the bundle (BasellineVersion).
I haven't found a way to search for installed bundles, but it is apparently possible to do a registry search for the bundle UpgradeCode. However, that's wix implementation details and should be used with care.

What i found important is: Use some kind of fallback condition, like the WixBundleInstalled (this variable is 1 if installed, 0 else). Without that, the SampleMsiInstalledState could be false because someone forced the bundle to uninstall, then the conditions would evaluate to false and the bundle won't run anymore. No user likes bundle corpses on the system.

Donnerstag, 11. April 2013

Setting up RaspberryPi with ArchLinux to automatically connect to WLAN

Got a RaspberryPi.
After simply dd'ing the ArchLinux onto an SD card, booting was possible, and composite output was working. Neat.
Plug in a wlan usb stick. Try to configure it like it was described here, but things just didn't work out fine. Problem was, the wlan0 device wasn't yet existing, when the boot process reached the starting of the wlan connection. Fail followed.

What kind of saved me, after I understood what to do, was this thread.
However, what I did was slightly different:
I called
systemctl --full
and search for the line providing something like this:
sys-devices-pci0000:00-0000:00:1c.1-0000:02:00.0-bcma0:0-net-wlan0.device
Then i put that into the file to After and BindTo
[edit]
Had to change my approach. Before, I changed the file /etc/systemd/system/network.service, but that kind of didn't work nicely. Probably, because network.service is not netcfg. The change in netcfg file below just adds two lines which tells Arch to wait with this netcfg service until the wlan is up and running:
After=sys-subsystem-net-devices-wlan0.device
BindsTo=sys-subsystem-net-devices-wlan0.device
so that we get the resulting file:
cat /etc/systemd/system/multi-user.target.wants/netcfg\@Stadtkater.service 
[Unit]
Description=Netcfg networking service for profile %i
Before=network.target
Wants=network.target
After=sys-subsystem-net-devices-wlan0.device
BindsTo=sys-subsystem-net-devices-wlan0.device

[Service]
Type=oneshot
RemainAfterExit=yes
ExecStart=/usr/bin/netcfg check-iface %i
ExecStop=-/usr/bin/netcfg down %i
KillMode=none

[Install]
WantedBy=multi-user.target
Not sure what I did there exactly and what's the difference between After and BindTo, but it worked and the raspberry pi connects now to the wlan after a fresh start. So now i can ssh and don't have to use a crappy TV signal anymore :)

Mittwoch, 20. März 2013

BURN #04: passing preprocessor variables into the build

A nice solution is explained here on stackoverflow:

it basically says that you should:

1st in the wixproj file add the following:
<Target Name="BeforeBuild">
    <CreateProperty Condition="$(BuildNumber) != ''"
Value="BuildNumber=$(BuildNumber);$(DefineConstants)">
      <Output TaskParameter="Value" PropertyName="DefineConstants" />
    </CreateProperty>
    <CreateProperty Condition="$(RevisionNumber) != ''"
Value="RevisionNumber =$(RevisionNumber);$(DefineConstants)">
      <Output TaskParameter="Value" PropertyName="DefineConstants" />
    </CreateProperty>
  </Target>
2nd in your msbuild task do this:
<MSBuild Projects="YourWixProject.wixproj" 
   Properties="BuildNumber=$(VerBuildNumber);RevisionNumber=$(RevisionNumber)" 
/>

Donnerstag, 14. März 2013

Writing custom NANT and msbuild tasks

Just a friendly reminder to reuse work of others.

See here for msbuild:
Nant help can be found here:
Or, since i only wanted to learn how to write a task which deletes directories which are older than XX:
Look at slashdot to delete all directories which are more than 7 days old

Sonntag, 24. Februar 2013

BURN #03: Applying patches in the bootstrapper

Slipstreaming msp packages (like tweaking the RTM installer to install patches automatically)

Technically, slipstreaming is installing the patch-msp with the msi in a single transaction:
msiexec /i D:\product.msi PATCH=D:\patch.msp

Andreas Kerl's .NET-dev article explained how to slipstream patches into an installer:
<PackageGroup Id="Product">
  <MsiPackage Id="Product" Name="packages\product.msi">
    <SlipstreamMsp Id="Patch"/>
  </MsiPackage>
  <MspPackage Name="packages\patch.msp"/>
</PackageGroup>

Well, that does not seem to be necessary, much simpler and also working due to the MspPackage/@Slipstream attribute being set to 'yes' always, this works too:
<PackageGroup Id="Product">
  <MsiPackage Id="Product" Name="packages\product.msi"/>
  <MspPackage Id="Patch" Name="packages\patch.msp"/>
</PackageGroup>

See Stewart Heath's article.

Freitag, 22. Februar 2013

Starting to LOG and TRACE my programs


BURN #02: How to sign the msi packages and the Bootstrapper

Some examples on conditions, how to change the installer GUI, and signing the packages.

http://neilsleightholm.blogspot.de/2012/05/wix-burn-tipstricks.html

About signing:
I created several .wixproj files for msbuild compilation. But to get signing to work, i had to do the following (this is probably just one way to do it):

Wix projects by default call a wix.targets task, which has many msbuild tasks for building the msi/merge modules, whatever with the installed wix version. It also holds an abstract task which you can redefine/redirect to sign you stuff.

To sign msi and cab packages:
<Target Name="SignCabs">
  <Exec Command="$(signToolCall) &quot;%(SignCabs.FullPath)&quot;" />
 </Target>
 
 <Target Name="SignMsi">
  <Exec Command="$(signToolCall) &quot;%(SignMsi.FullPath)&quot;" />
 </Target>

To sign BURN bootstrapper:
<Target Name="SignBundleEngine">
  <Exec Command="$(signToolCall) &quot;@(SignBundleEngine)&quot;" />
 </Target>
 
 <Target Name="SignBundle" >
  <Exec Command="$(signToolCall) &quot;@(SignBundle)&quot;" />
 </Target>

And most important: each .wixproj file must have a property called (it does not matter in which property group you push that):
<PropertyGroup>
  <!-- this makes wix sign everything it can -->
  <SignOutput>true</SignOutput>
 </PropertyGroup>

To streamline everything, just put this one line into your .wixproj file:
    <Import Project="$(WixTargetsPath)" />
 <!-- the WixTargetsPath line already exists. add your default targets file to your .wixproj targets -->
    <Import Project="..\Default.targets" />

And to round everything up, here's my complete Default.targets file with methods to find the ProgramFiles (x86) directory and the windows installer SDK directory:
<?xml version="1.0" encoding="utf-8"?>
<Project ToolsVersion="4.0" xmlns="http://schemas.microsoft.com/developer/msbuild/2003">
 <PropertyGroup>
  <!--MSBuild 4.0 property-->
  <ProgramFiles32>
  $(MSBuildProgramFiles32)
  </ProgramFiles32> 
  <!--Use OS env var as a fallback:- 32 bit MSBuild 2.0/3.5 on x64 will use this-->
  <ProgramFiles32 Condition=" '' == '$(ProgramFiles32)'">
  $(ProgramFiles%28x86%29)
  </ProgramFiles32>

  <!-- Handle MSBuild 2.0/3.5 running in 64 bit mode - neither of the above env vars are available. http://stackoverflow.com/questions/336633
       NB this trick (Adding a literal " (x86)" to the 64 bit Program Files path) may or may not work on all versions/locales of Windows -->
  <ProgramFiles32 Condition ="'$(ProgramFiles32)'=='' AND 'AMD64' == '$(PROCESSOR_ARCHITECTURE)'">
  $(ProgramFiles) (x86)
  </ProgramFiles32>

  <!--Catch-all - handles .NET 2.0/3.5 non-AMD64 and .NET 2.0 on x86 -->
  <ProgramFiles32 Condition=" '' == '$(ProgramFiles32)' ">
  $(ProgramFiles)
  </ProgramFiles32>

  <!-- some important directories -->
  <ProductsDir Condition=" '$(ProductsDir)' == '' ">
  $(MSBuildThisFileDirectory)..\Products\
  </ProductsDir>
  <msiDir>
  "$(ProgramFiles32)\Microsoft SDKs\Windows\v7.0A\bin\"
  </msiDir>
  
  <!-- signtool configuration -->
  <signTool>
  $(msiDir)signtool.exe
  </signTool>
  <timeStampServer>
  http://timestamp.verisign.com/scripts/timestamp.dll
  </timeStampServer>
  <signKey>
  "$(ProductsDir)your_key_file.pfx"
  </signKey>
  <uniformResourceLocator>
  www.your_web_adress.com
  </uniformResourceLocator>
  <signToolCall>
  $(signtool) sign  /f $(signKey) /p smokey11 /du $(uniformResourceLocator) /t $(timeStampServer)
  </signToolCall>
 </PropertyGroup>

 <PropertyGroup>
  <!-- this makes wix sign everything it can -->
  <SignOutput>true</SignOutput>
 </PropertyGroup>
 
 <Target Name="SignCabs">
  <Exec Command="$(signToolCall) &quot;%(SignCabs.FullPath)&quot;" />
 </Target>
 
 <Target Name="SignMsi">
  <Exec Command="$(signToolCall) &quot;%(SignMsi.FullPath)&quot;" />
 </Target>
 
 <Target Name="SignBundleEngine">
  <Exec Command="$(signToolCall) &quot;@(SignBundleEngine)&quot;" />
 </Target>
 
 <Target Name="SignBundle" >
  <Exec Command="$(signToolCall) &quot;@(SignBundle)&quot;" />
 </Target>
</Project>

Dienstag, 19. Februar 2013

BURN #01: Get the BootstrapperApplicationData.xml

This one is not tricky at all. You basically want to get this data if your installer is running, to get the dependencies of the .msi packages right.
Now, there's no example from wix.sourcefourge.com, nor from anywhere else I searched.

This code in your BootstrapperApplication UX (user experience) gets you the file.
    string fileName = "BootstrapperApplicationData.xml"; 
    string path = Path.Combine(Path.GetDirectoryName(Assembly.GetExecutingAssembly().Location), fileName); 
    using (FileStream stream = new FileStream(path, FileMode.Open)) 
    { 
        ... 
    }

If you want to have this file without running your installer: don't go starting it and searching for the file. That'd suck. No, just go to cmd, and run:
%WiX%\bin\dark.exe <your_file> -x <extract_to_this_dir>

So, how to get custom data in there?
It's a bit fuzzy at the moment, but Rob Mensching said:
You just add rows to a table that has BootstrapperApplicationData="yes". The Binder will translate all those rows into BootstrapperApplicationData.xml.
-----------------------
First, the CustomTable definition (just Column elements) can be put in a separate Fragment. Then, when you populate a CustomTable (add Row elements) that CustomTable will reference the definition.That means you need to put the CustomTable/Row in a fragment that is referenced. 
Often, the CustomTable/Row data is so verbose, there is a tendency to put it in a separate Fragment. That is a completely reasonable but now it's floating in an island that needs a "hackish" reference. Empty PayloadGroup for Bundles is very good, BTW.
So what's the ideal?  The ideal is to create an Extension. The Extension would then extend the compiler to provide a "pretty face" on your CustomTable and be far more powerful than the raw Row elements. 
We cheated for a long time with the wixstdba by using WixVariables before finally creating the "pretty face". Looking back, we should have done it earlier. <smile/>